Saving Supermarket Basil Plants: How to Keep Them Alive
A pot of supermarket basil can look fantastic when you bring it home: dozens of bright green leaves, plenty of stems, and enough basil for several meals.
Then, a few days later, it starts to droop.
Leaves turn yellow or brown. Stems collapse. The soil seems to go from soaking wet to bone dry almost overnight. Before long, the lush plant you bought has become a collection of struggling stems.
The problem isn't necessarily your gardening ability.
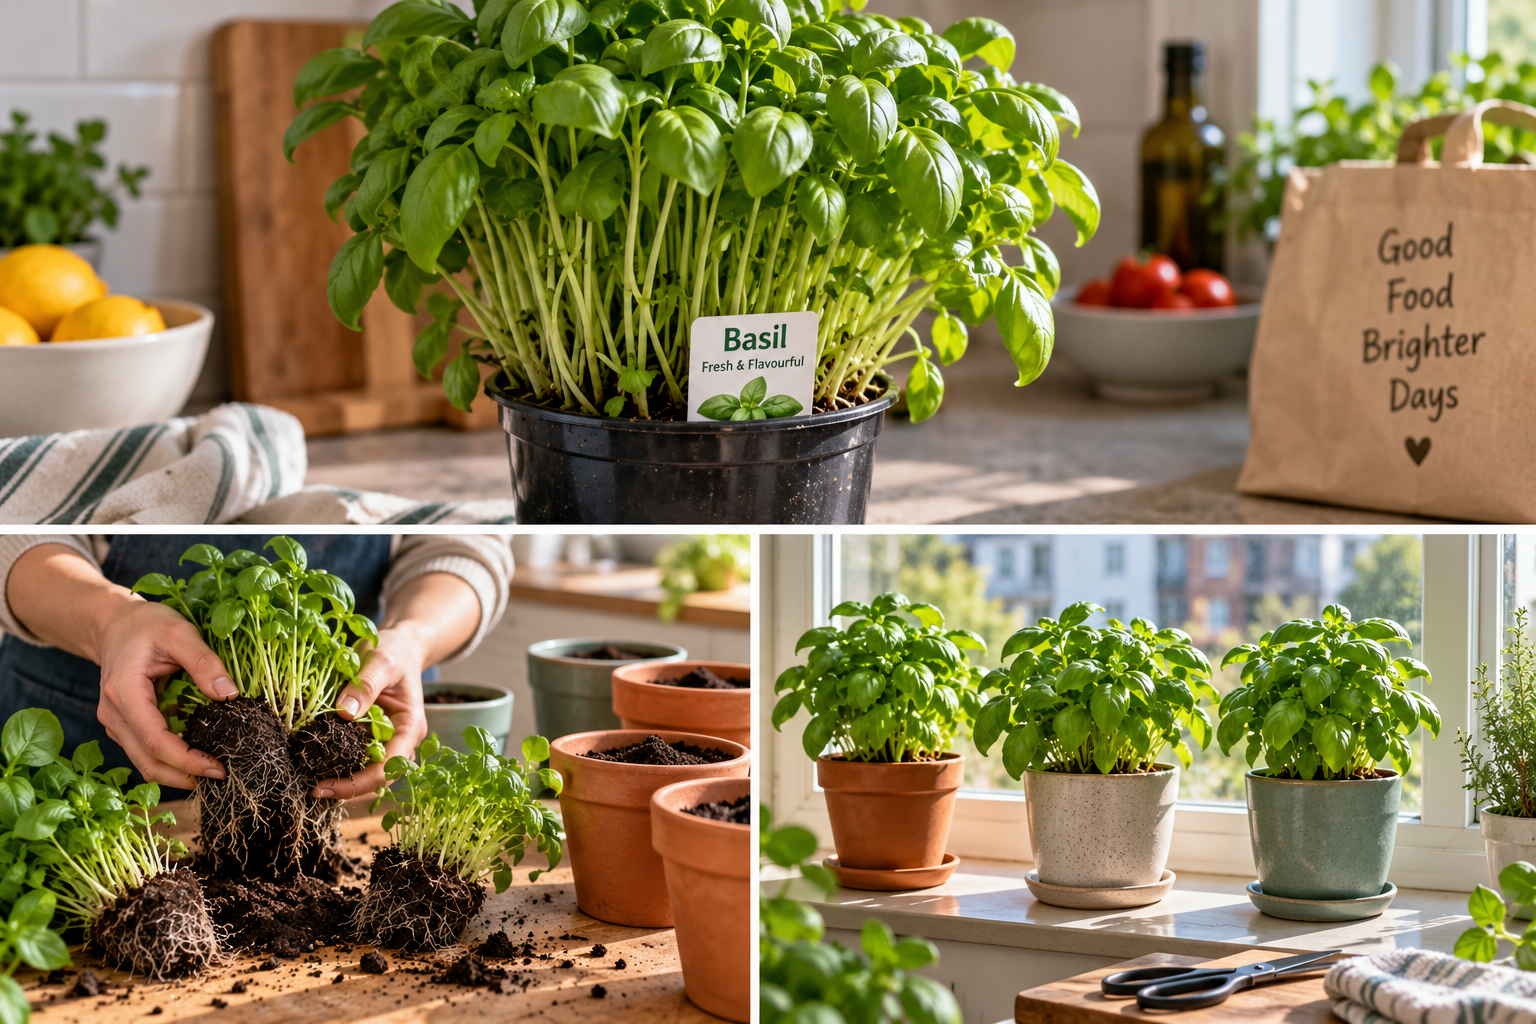
Supermarket basil is usually grown to provide a large amount of fresh basil quickly, not to spend months happily growing on your windowsill. What looks like one impressive plant is often a crowded collection of many young basil plants sharing a very small pot.
Fortunately, that means you can greatly improve its chances.
Saving supermarket basil plants is mostly about reducing competition, giving the roots more room, providing enough light and learning how to keep the soil consistently—but not permanently—wet.
Why Does Supermarket Basil Die So Quickly?
Take a close look at the base of a supermarket basil pot.
You'll probably discover that the impressive “plant” isn't one plant at all.
There may be many individual seedlings packed together. That produces the dense, attractive pot shoppers want, but all those plants are competing for the same limited resources:
- root space
- water
- nutrients
- light
- airflow
The small amount of potting mix can also dry very quickly because so many roots are drawing water from it.
This explains one of the classic supermarket basil experiences: you water it, everything looks fine, and surprisingly soon the entire pot is drooping again.
Rather than trying to maintain that crowded arrangement indefinitely, you can give some of those plants more room.
Don't Repot a Severely Wilted Plant Immediately
If you've brought home basil that is already badly wilted, deal with the immediate problem before performing major surgery.
Check the soil.
If it is very dry and the plant is limp, give it water and allow it some time to recover. Basil can sometimes look dramatically unhappy when thirsty and then recover surprisingly well.
If the soil is already saturated, don't automatically add more water. Wilting isn't proof that a plant needs another drink.
Give the pot suitable light and assess its condition.
Once the basil is reasonably hydrated and stable, you can think about separating or repotting it.
Give Your Basil More Room
One of the most useful things you can do with densely packed supermarket basil is divide it.
You don't necessarily need to separate every individual seedling. That can cause unnecessary root damage and leave you with far more pots than you wanted.
Instead, divide the original root mass into several smaller groups.
Prepare a few pots with drainage holes and suitable potting mix.
Carefully remove the basil from its original container. Support the root mass rather than pulling plants out by their stems.
Gently tease the root ball apart into several sections. Some roots will inevitably be disturbed, so don't worry about achieving a perfectly clean separation.
Plant each group into its own container with fresh potting mix.
The objective isn't perfection. It's simply to turn one extremely crowded pot into several much less crowded ones.
Always Use Pots With Drainage
Basil likes consistent access to moisture, but that doesn't mean its roots should sit permanently in stagnant water.
Use pots with drainage holes so excess water can escape.
Place a saucer underneath to protect your windowsill or furniture, and empty substantial amounts of standing water rather than leaving the pot submerged indefinitely.
If you want to use an attractive decorative container without holes, keep the basil in a smaller draining pot inside it.
That gives you the appearance you want without trapping water around the roots.
Expect Some Transplant Shock
Your newly divided basil may not immediately look better.
You've just changed its environment and disturbed its roots. Some leaves may droop and a few plants may fail to recover.
That doesn't necessarily mean the entire rescue attempt has failed.
Place the repotted basil somewhere bright and warm, water appropriately, and give it time to settle.
Avoid immediately adding every possible form of plant care at once. Repotting, heavy pruning, fertilizing and repeatedly moving the plant around can create more stress rather than less.
Let it recover.
Give Basil Plenty of Light
Basil is not a plant that wants to live in the darkest corner of your kitchen.
Give it a bright location with plenty of usable light.
A sunny windowsill can work very well, although the exact amount of light depends on your window orientation, surrounding buildings, season and location.
If the plant receives too little light, growth can become weak and stretched.
If your home simply doesn't provide enough natural light, a small grow light can help.
Watch the plant rather than assuming that any location next to a window must automatically be bright enough.
Keep Basil Warm
Basil likes warmth.
A bright windowsill may seem ideal, but consider the temperature there as well.
Cold glass, strong winter drafts or very cool nighttime conditions can make a windowsill less hospitable than it appears.
Likewise, don't place the plant where it receives blasts of cold air from air conditioning.
A warm, bright and reasonably stable indoor environment is preferable.
Learn When Your Basil Needs Water
Crowded supermarket basil can be confusing because the original pot may dry extremely quickly.
After dividing the plants into more appropriate containers, watering should become easier to manage.
Check the soil regularly.
Don't wait for the entire plant to collapse dramatically before you notice that the pot has become very dry, but don't compensate by keeping the soil permanently waterlogged either.
Water thoroughly when needed and let excess water drain.
How frequently that happens depends on your home, pot size, temperature, light and the size of the plants.
That's why a rule such as “water basil every two days” isn't very useful.
Check the plant and soil instead of the calendar.
Should You Remove Some Leaves?
If the basil is extremely crowded or has suffered during transplanting, you may be tempted to strip away lots of foliage.
Be conservative.
Remove leaves that are clearly dead, badly damaged or decaying, but remember that healthy leaves are how the plant captures the energy it needs to grow.
Once the plants have recovered and begun producing healthy new growth, regular harvesting can help encourage a useful, bushier plant.
Harvest From the Top
When your rescued basil is growing well, don't just pull off random large leaves whenever you need some for dinner.
Look at how the stems grow.
Harvesting or pinching above a suitable pair of leaves can encourage the plant to branch from nodes below the cut, producing a bushier shape instead of one long stem.
Avoid removing too much of a small or recovering plant at once.
The goal is to harvest regularly while leaving enough healthy foliage for continued growth.
Don't Let It Flower Too Early
As basil matures, it may begin producing flower buds.
Flowering isn't a disaster, but if your main goal is a steady supply of leaves, pinching off flower buds can help keep the plant focused on leafy growth for longer.
Check the tops of the stems when harvesting.
Removing developing flower spikes is easy to incorporate into your normal basil routine.
Does Supermarket Basil Need Fertilizer?
Not immediately.
If you've just divided and repotted the basil into fresh potting mix, give the plants time to establish themselves first.
Depending on the potting mix, nutrients may already be available.
Once the basil is actively growing in containers over a longer period, appropriate feeding can become useful. Choose a fertilizer suitable for edible container plants and follow its instructions.
More fertilizer does not automatically mean more basil.
Can You Save the Original Pot Without Dividing It?
Possibly, at least for a while.
You can keep harvesting from the original supermarket pot and pay very close attention to watering.
But the underlying problem remains: many plants are competing in a small volume of soil.
If your goal is simply to use the basil over the next week or two, you may decide that dividing it isn't worth the trouble.
If you want to keep it growing for much longer, giving at least some of the plants additional root space usually makes more sense.
An Even Easier Backup: Take Cuttings
There's another useful strategy if some of the original plants are healthy.
Take a few basil cuttings.
Basil can root readily in water under suitable conditions. That gives you a way to produce fresh plants even if the original crowded pot doesn't survive indefinitely.
It can also be a fun introduction to propagation.
A Simple Supermarket Basil Rescue Plan
Step 1: Check whether the basil is thirsty.
If it is badly wilted and the soil is dry, water it and let it recover first.
Step 2: Prepare several small pots.
Use containers with drainage holes and suitable potting mix.
Step 3: Remove the crowded root ball carefully.
Handle the roots rather than pulling on individual stems.
Step 4: Divide it into several groups.
Don't worry about separating every single seedling.
Step 5: Repot each group.
Give the roots more room and gently settle fresh potting mix around them.
Step 6: Water and let excess moisture drain.
Step 7: Place the pots somewhere warm and bright.
Step 8: Give them time to recover.
Don't panic if some leaves droop after repotting.
Step 9: Start harvesting once healthy new growth appears.
You may lose some individual plants.
That's fine.
The objective isn't to save every seedling in the original pot. It's to turn a short-lived supermarket product into a smaller number of healthier basil plants that have a much better chance of continuing to grow.
From Grocery Store to Windowsill Herb
Supermarket basil isn't doomed.
It's simply been grown for a different purpose than the long-term indoor herb plant you want it to become.
Give the plants more room, good drainage, plenty of light, appropriate warmth and sensible watering, and you can often extend their useful life dramatically.
And once you've successfully rescued one overcrowded pot, that supermarket basil display starts to look rather different.
It isn't just tonight's pesto.
It can be the beginning of your next basil plant.