Rooting Herb Cuttings in Water: A Simple Beginner Guide
One of the most satisfying things about growing herbs indoors is discovering that a piece you cut from one plant can become an entirely new plant.
You don't necessarily need seeds, specialist propagation equipment or much gardening experience.
For herbs that root readily from stem cuttings, you can often start with a healthy piece of stem, a glass of water and a little patience.
Even better, you can watch the process happen.
Small white roots begin appearing from the submerged part of the stem. Those roots grow longer and branch, and eventually the cutting can be moved into potting mix and grown as a separate plant.
Rooting herb cuttings in water is therefore an excellent first propagation project for an indoor gardener.
Here's how to do it.
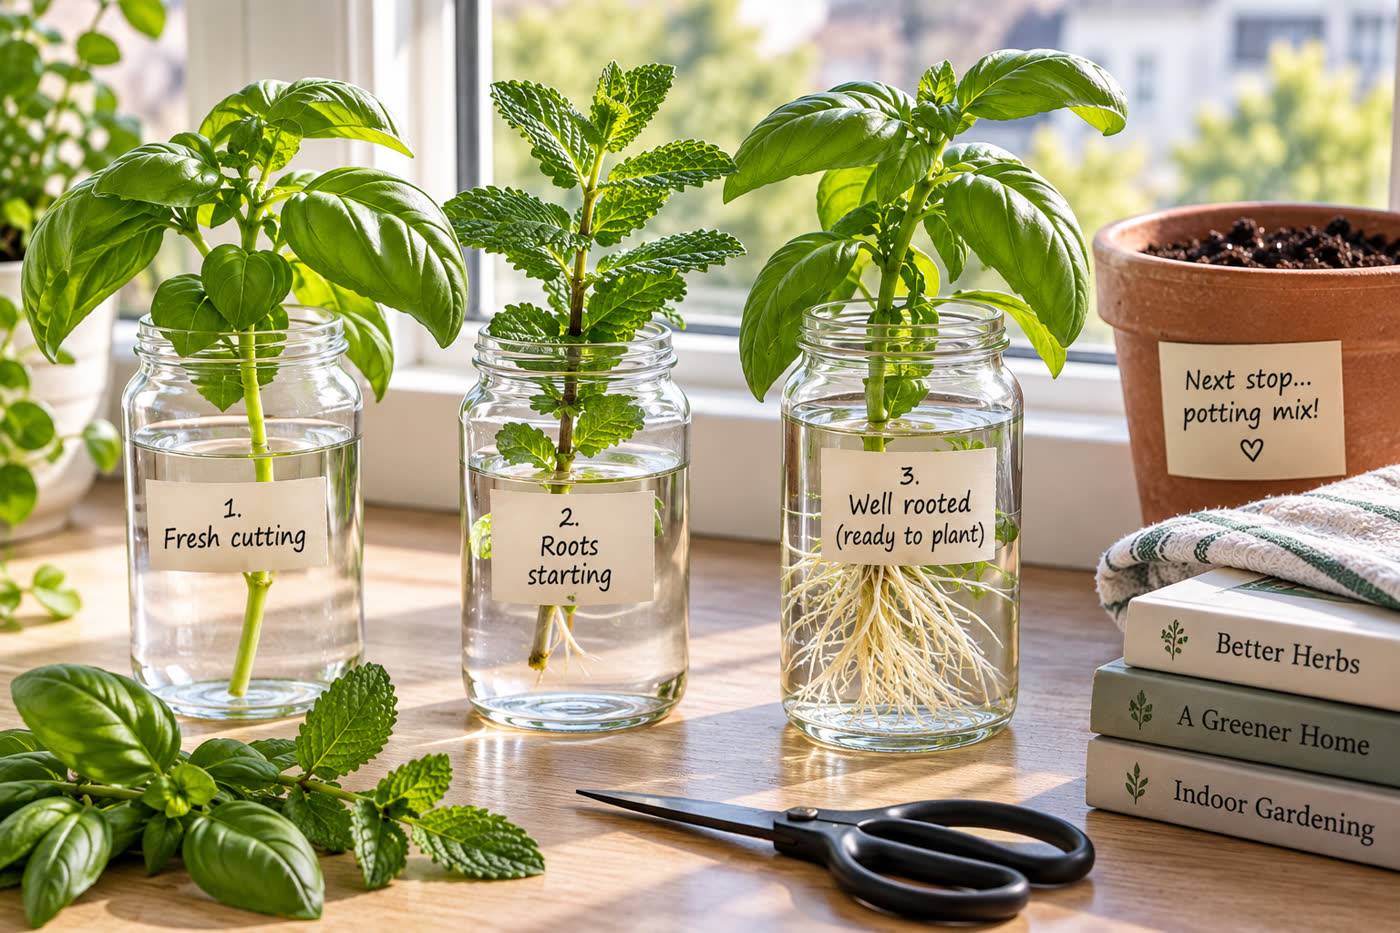
What Does Rooting a Cutting in Water Mean?
A cutting is simply a piece taken from an existing plant and used to grow another plant.
With water propagation, the lower part of a suitable stem cutting is placed in water rather than directly into potting mix.
Under the right conditions, the cutting develops new roots.
Once those roots are sufficiently developed, you can move the young plant into a container with potting mix.
The original cutting hasn't merely stayed fresh in the glass.
It has begun becoming an independent plant.
Which Herbs Can You Root in Water?
Not every herb responds equally well to water propagation.
Soft-stemmed herbs are generally the easiest place for a beginner to experiment.
Herbs commonly propagated from stem cuttings include:
- basil
- mint
- lemon balm
- oregano
Other herbs may also be propagated from cuttings, but some woody herbs can be slower or less straightforward for a first attempt.
If you've never propagated anything before, basil or mint can make a particularly satisfying starting point.
Also remember that the cutting must come from the right kind of plant material. You can't expect a random leaf with no suitable stem and node to behave like a proper stem cutting.
What You Need
Water propagation doesn't require an impressive collection of equipment.
For a simple attempt, gather:
- a healthy herb plant
- clean, sharp scissors or snips
- a clean glass, jar or small container
- fresh water
- a suitable bright location
Other herbs may also be propagated from cuttings, but some woody herbs can be slower or less straightforward for a first attempt.
If you've never propagated anything before, basil or mint can make a particularly satisfying starting point.
Also remember that the cutting must come from the right kind of plant material. You can't expect a random leaf with no suitable stem and node to behave like a proper stem cutting.
Later, when roots have developed, you'll also need a small pot with drainage holes and suitable potting mix.
You don't need a decorative propagation station.
A clean drinking glass or small jar lets you see the roots perfectly well.
1. Choose a Healthy Stem
Start with healthy plant material.
Look for a vigorous stem with healthy leaves rather than one that is already badly damaged, diseased or collapsing.
A cutting has to survive while developing a new root system, so beginning with strong material gives it a better chance.
If possible, avoid selecting a stem that is heavily flowering.
You're trying to encourage the cutting to establish itself as a new plant rather than asking it to support flowers at the same time.
2. Make the Cut in the Right Place
Look closely at the stem before cutting.
You'll see points where leaves emerge from the stem. These areas are called nodes.
Nodes matter because they're important growth points and are often where new roots develop during propagation.
Make a clean cut so that your cutting includes suitable stem and nodes rather than simply snipping off a leaf.
You don't need an enormous cutting.
A manageable piece of healthy stem with several leaves and appropriate nodes is easier to place in a small container and monitor.
3. Remove the Lower Leaves
Before putting the cutting into water, look at which part of the stem will be submerged.
Remove leaves from that lower portion.
You want the stem and at least an appropriate node in the water, but you generally don't want a cluster of leaves sitting below the waterline.
Submerged leaves can deteriorate and foul the water.
Keep healthy foliage on the upper part of the cutting so the plant still has leaves available for photosynthesis.
Don't strip the entire stem bare.
4. Put the Cutting in Water
Fill your clean container with enough water to cover the lower stem and appropriate node or nodes.
Place the cutting in the container.
Make sure the remaining leaves stay above the water.
If you're propagating several cuttings, don't cram so many into one tiny glass that the stems and leaves form another overcrowded plant problem.
Several small containers can be easier to manage than one extremely crowded jar.
The clear container also gives you one of the pleasures of water propagation: you can see what's happening below the surface.
5. Give the Cutting Light
6. Keep an Eye on the Water
Check the container regularly.
Water can evaporate, so make sure the nodes you're trying to root don't end up sitting above the waterline.
If the water becomes unpleasant, cloudy or develops debris, replace it with fresh water and keep the container clean.
You don't need to disturb the cutting constantly just to prove you're taking care of it.
Mostly, you're maintaining a clean, suitable environment and waiting for the plant to do the interesting part.
How Long Do Herb Cuttings Take to Root?
This is the question that makes people stare at a glass of basil several times a day.
There isn't one exact timetable for every cutting.
Root development depends on the herb, the individual cutting and its growing conditions.
Some easy-to-root herbs may begin showing visible root development relatively quickly, while others take longer.
Rather than treating a particular number of days as a deadline, watch the cutting.
The first root may appear as a tiny pale bump or short white growth.
Then, if things are going well, the roots lengthen and additional roots develop.
That's much more useful information than deciding your cutting has "failed" because a calendar date arrived.
When Is the Cutting Ready for Soil?
Don't rush to pot the cutting the moment you see the first tiny root.
Give it time to develop a useful root system.
At the same time, there's little advantage in leaving a well-rooted cutting in a glass indefinitely if your goal is to grow it as a normal potted herb.
You're looking for multiple healthy roots that have developed enough to support the transition into potting mix.
The exact appearance will vary between plants.
Use root development - not simply the number of days in water - as your guide.
Moving a Water-Rooted Herb Into Potting Mix
Prepare a small container with drainage holes and suitable potting mix.
Make a planting space large enough to accept the roots without forcing them into a tight ball.
Remove the cutting carefully from the water.
Water-grown roots can be delicate, so handle them gently.
Place the rooted cutting into the pot, settle the potting mix around the roots and water appropriately.
The move from water to potting mix is another change in the plant's environment, so don't be alarmed by a little temporary adjustment.
Keep providing appropriate light and monitor the moisture in the potting mix while the plant establishes itself.
Why Isn't My Cutting Growing Roots?
Sometimes a cutting simply sits there.
Before giving up, check the basics.
- Did you start with healthy plant material?
- Does the cutting contain suitable nodes?
- Is an appropriate node actually submerged?
- Are leaves rotting below the waterline?
- Has the water level dropped too far?
- Is the cutting receiving appropriate light?
- Is it exposed to temperature extremes?
- Is the stem beginning to rot rather than root?
And sometimes one cutting fails while another taken from the same plant succeeds.
That's one reason taking a few cuttings can be useful.
Propagation isn't a promise that every piece of stem becomes a plant.
Common Water Propagation Mistakes
Water propagation is simple, but a few mistakes make it less successful.
- Taking weak or badly damaged cuttings
- Putting leaves underwater
- Using a stem without suitable nodes
- Letting the water level fall below the rooting area
- Ignoring badly deteriorating water
- Putting the cutting somewhere extremely dark
- Exposing a vulnerable cutting to excessive heat
- Planting it into soil the instant the first tiny root appears
- Damaging delicate roots when potting it
You also don't need to turn propagation into a laboratory experiment.
Start with clean equipment, healthy plant material, appropriate water and light, and observe what happens.
One Herb Can Become Many
Once you've successfully rooted your first herb cutting, something changes in the way you look at your plants.
A healthy stem is no longer necessarily just something to harvest.
It can be the beginning of another plant.
That makes propagation useful for expanding your own indoor herb garden, replacing an aging plant or sharing herbs with someone else.
It's also one of the cheapest ways to increase the number of plants you grow.
You don't need an expensive propagation station.
You need a suitable herb, a healthy cutting, a little water and enough patience to let roots appear.
If you're rescuing a crowded grocery-store basil plant:
Related: Saving Supermarket Basil Plants
If you're deciding whether to buy plants or grow your own:
Related: Seeds Versus Starter Herb Plants
For a low-cost indoor garden:
Related: Budget Indoor Herb Garden List
And for the complete beginner path:
Back to: Getting Started With Indoor Herb Gardening
Your cutting still needs light.
Place it in a bright location suitable for the herb, but remember that a fresh cutting is not yet an established plant with a functioning root system.
Avoid treating "more light" as an instruction to cook a vulnerable cutting against extremely hot glass.
A bright indoor location without unnecessary temperature extremes is a sensible starting point.
Then observe how the cutting responds.